|

CSP-2 Press Rod Extensions

 The CSP-2EXT press rod extension kit adds another three inches of "daylight" or total space between the base of the press, and the position of the press head. This additional height does not change the press stroke (which is adjustable from 3 to 6 inches). It is useful when reloading long cartridges such as the 20mm, or for seating long .50 BMG bullets. In some cases, a special shell holder or priming tool might take up too much of the available opening height. The extender kit can give you enough extra space to accomodate special tools.
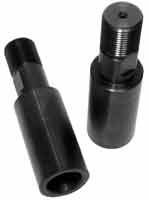
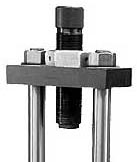 The kit consists of two carefully machined threaded rods, polished and deep blued. The rods have been matched for length to avoid any tipping of the press head, and to maintain perfect alignment. To install them:
- Unscrew the two hex nuts on the top of the press head.
- Lift off the press head. You can use a block of wood between the ram and press head to help push it off.
- Apply light grease to the threads on the end of each press rod, and screw the extensions onto them by hand.
- Gently but firmly secure each of the two rods with a properly fitting open end wrench, using the machined flats on the extensions to apply force. Do not use pliers or any kind of tool with teeth, like a pipe wrench. Use only a properly fitted open end wrench (adjustable Crescent type wrenches usually do not fit well enough and may mar the finish).
- Apply light grease to the threads on the extensions. If your press has two hardened washers under the head retaining nuts, apply a film of grease to both sides of the washers. Slip the press head onto the extensions. Drop the washers over the ends of the extensions. Screw the two hex nuts finger tight.
- If you have the Corbin CSP-2J Alignment Jig, install it into the ram, and run the ram up so the jig fits through the press head (move the head to align it so the jig will pass through).
- If you do not have the Corbin CSP-2J Alignment Jig, use a dial indicator to adjust the head position so it is concentric with the ram. A rod turned to just slip into the non-threaded portion of the ram hole can be used as an alignment indication point.
- While making sure that the head does not move from the torque, secure the two hex nuts with a properly fitted box or torque wrench, applying the same force to each. Watch the alignment of the head, and make sure that it is correctly centered when the final torque is applied.
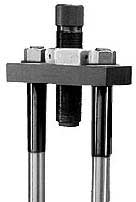
Note: The CSP-2 press uses grade 8 hardened "aircraft grade" hex nuts and hardened steel washers so that you can secure the head with greater torque, without moving the head. This helps maintain close alignment during the replacement of the head. The Corbin CSP-2J Alignment Jig can be used on either the CSP-2 or CSP-2H Hydro Junior, or on the CHP-1 Hydro Press. The CSP-2EXT extensions can also be used on the CHP-1 or CSP-2H hydraulic presses. However, the CSP-2H and CHP-2 have a six inch full power stroke and do not usually require additional daylight or head to base opening space. Hand presses, which have a fixed stroke starting and ending point with a log power curve, develop full power at the top of the stroke, so position is more critical.
|

