| Home | Presses | Intro | Site Map | P.R. | Chemicals | Answers |

|
| Prices | Specials | How To | Bullets | B.Makers | Books | Classified | |
| Topics | Jackets | Terms | Training | Software | Products | Contact us |
| Home | Presses | Intro | Site Map | P.R. | Chemicals | Answers |
|
| Prices | Specials | How To | Bullets | B.Makers | Books | Classified | |
| Topics | Jackets | Terms | Training | Software | Products | Contact us |

|
 Draw Dies
ET-2-R
ET-2-S Draw Dies
ET-2-R
ET-2-S
|
|
|
|
|
ET-1
 The ET-1 system uses a fixed length punch of two diameters. You need a specific punch for each length of jacket that you wish to make. However, it trims the surplus material completely away from the final jacket, so no manual separation is required. However, because the larger diameter of the punch must fit inside the jacket before trimming takes place, the jacket must either be pre-expanded to the distance of the trim, or it must start out as a larger jacket than you want and be drawn down during the trim.
Larger Jacket Reduction If you have a jacket that can be reduced at least twice its wall thickness, then it is possible to build a single die that will both reduce and trim the jacket to a specified length. For example, to reduce from a .308 to a .284 is .014 inches of outside diameter reduction. If the walls of your .308 jacket are .007 or less, then it means the ID of the .308 jacket would be large enough to fit the .284 punch inside prior to drawing. But few .308 jackets are that thin. Most of them have closer to .020 inch walls (near the point of desired trim). 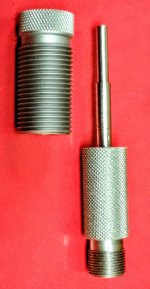 This would mean that a stepped punch, with the top small enough to fit inside after drawing, but the bottom exactly the OD of the drawn jacket, would have to be .308 minus two times .020 inches, or .308 - .040 = .268 inches maximum size to fit inside this jacket. Therefore, you could not use this method of drawing and trimming for any caliber larger than .268 inches. You could use the 0.020 wall .308 jacket to make a .264, or a .257 trimmed jacket. But you could not make a 7mm (.284) or a .270 (.277).
 Same Size Jacket
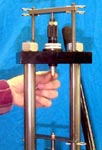
However, there is a trick you could use. Instead of drawing the .308 down with the stepped trimming punch inside it, you could pre-expand the jacket in another die, with a tapered punch. Then, you could use the stepped punch to draw and trim it, because the punch would now fit inside the expanded portion of the jacket. This is the 2-die method of using an ET-1. The expander die is necessary when you wish to use the same caliber jacket before and after trimming, or when the trimmed/drawn jacket will be within two wall thicknesses of the original diameter. 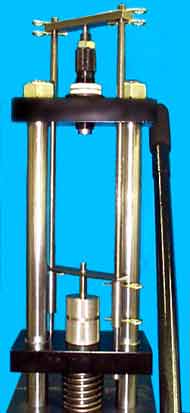 In both cases, some kind of stripper assembly will be needed to pull the expanded jacket or the surplus material trimmed from the jacket off the punch. The pressure needed to expand or to pinch trim the jacket is enough to press the jacket tightly on the punch, so you probably can't remove it by hand. This is accomplished by making a snug fitted hole in a disk or a steel bar. The disk is used when you can drop a steel tube over the ram of the press for support on the down stroke. The bar is used in presses where the ram does not allow a tube over it, such as the Hydro Press or the Mega Mite press. In those presses, an ejector assembly that is suspended from the press head supports the bar, and stops it while the ram continues down, to strip the material from the punch.
As you can see, the ET-1 system consists of various components that may be required when using different jackets or presses. Sometimes it is one die, sometimes it is two dies, and usually it requires some kind of ejector mechanism (disk and tube, or the -H ejector system). The price will depend on the specific jacket and press you wish to use. It is best to discuss this and send sample jackets to get a quote. |
ET-2
 The ET-2 die is a more simple and easily quoted method of trimming jackets. It is not specific to a length or to a wall thickness. One ET-2 die can be used with various jackets of a given caliber (so long as their outside diameter is the same, the length and wall thickness or inside diameter is not critical).
The only drawbacks of the ET-2 compared to the ET-1 are:
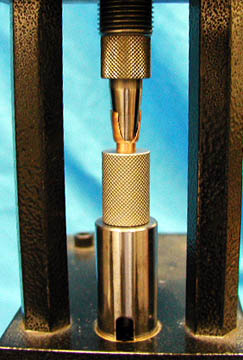 The ET-2 works by using a tapered cone style of punch, made of very hard material, which presses the jacket firmly against the edge of the hole leading into the die. The entrance hole has a sharp edge, to press almost completely through the jacket...but not quite all the way, which would press the conical punch against the hard steel die edge, and roll over the edge.
So long as there is a thin buffer of jacket material between the punch and the die, the ET-2 works very nicely. It is very quick to use, and is adjustable for length. The amount of material to be trimmed off the jacket is whatever projects beyond the die mouth. An internal punch supports the closed end of the jacket, inside the die. The distance this punch moves back before coming to rest in the ram, or in a reloading press die body, depends on a screw setting on the punch head. Moving the punch setting up and down changes the length of the trimmed jacket. 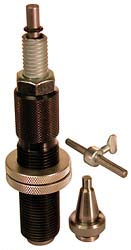 An adjustable gauge is provided with the ET-2 at no extra cost, which lets you pre-set the length of the trim without trial and error. On the -S and -H types of ET-2 dies, the internal punch is pre-set and then put into the press ram. On the -R type, the setting can be made with the die installed in the press. The punch is put into the punch holder (or into the reloading press ram) and then the ram is carefully raised, with no jacket installed in the die. The punch holder position, or the die position in a reloading press, is set so that the punch just touches the die without any resistance. That is, the ram is raised fully, and the punch holder (or -R die) is screwed down by hand until the die mouth contacts the punch gently.
At this setting, the punch cannot go any closer to the die, and therefore could not crush or roll over the edge of the die. With a jacket installed in the die, there would be no room for the jacket between the punch and die, and a thin film of material would be all that remained after the ram was raised. The mouth of the jacket is expanded in a cone, which may or may not split. If by chance the cone is separated from the jacket, it must be removed from the punch before another jacket is trimmed (it should come off very easily by finger pressure alone). More likely, the jacket will be left with the cone attached by a thin web at the trim line. Lower the ram, eject the jacket, and either snap off the cone by hand, or pinch it off with a pair of pliers (which should not affect the jacket beyond the trim line). Or put the jackets into a tumbler and let them knock the cones off as they roll around. Note that the trimmed jacket edge is sharp and beveled, and should be very cleanly cut.  If the cones do not come off easily, or the jacket sticks in the die, or the jacket will not enter the die without some effort, it means either the jacket is oversized or the edge has been peened over. To fix the edge, the die is put into a collet and a light face grind at exactly 90 degrees to the die bore is made across the die. The depth is just enough to clean up the edge of the hole, so it is once again sharp. Note that it only takes one stroke of the press to destroy this cutting edge, if the punch is set too close to the die, so be careful when adjusting. Always start with the ram fully up and bring the die and punch together by turning the punch holder (or the die, in the -R system) until contact is made. Then stop!
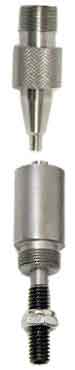
In the Hydro Press, there is a slight drift in the ram at the top of the stroke, which normally causes no problem. But in this case, it can over-stress the edge of the trim die. Set up the Hydro Press so that the ram stops at the mechanical limit of the cylinder, not using the top sensor. Move the top sensor so it is just above the limit of ram travel. Then turn on the pressure reversing switch, set the drive pressure to a reasonable level such as 800 psi, and set the reversing pressure to switch at a level below this (such as 750 psi). The actual pressure isn't important, because the die and punch are not what stops the ram if you use the cylinder limit position for a stop. Set the dwell time at the top of the stroke for 10-15 milliseconds, to allow a little "flow" time for the pinched jacket material, and to avoid a sudden shock wave in the hydraulic lines from changing flow direction too quickly. 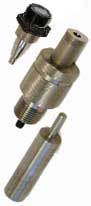 The ET-2-H consists of an ET-2-S die and punch, plus an adapter for the 1.5-inch x 12 thread -H press head, and an adapter kit for the ram. The ram adapter holds the -S die and also supports the internal punch (which adjusts for length of trim). An ejector punch is provided to adapt the much deeper and larger -H ram design to the smaller -S punch. It is a "pusher" with a standard -H head and a short stub that pushes on the -S punch head to eject the cut jacket. The adapter kit can be purchased separately, allowing existing -S trim dies to be used in the larger -H presses. If you have one ET-2-H die, you can purchase ET-2-S dies to use in the same adapters, which saves money over purchasing the complete -H die set with adapters included.
|
| Home Page | Price List | E-Mail Sales | Site Map | New Products | Q&A | Terminology |
| Retirement | Specials | Real Estate | Software | How to swage | Classified Ads | Feedback |
We're available Monday through Thursday, from 9AM to 5PM Pacific time.
We'd love to hear from you!
Call (541) 826-5211 or FAX (541) 826-8669.
Or write to:
CORBIN
PO Box 2659
White City, OR 97503 USA