| Home | Presses | Intro | Site Map | P.R. | Chemicals | Answers |

|
| Prices | Specials | How To | Bullets | B.Makers | Books | Classified | |
| Topics | Jackets | Terms | Training | Software | Products | Contact us |
| Home | Presses | Intro | Site Map | P.R. | Chemicals | Answers |

|
| Prices | Specials | How To | Bullets | B.Makers | Books | Classified | |
| Topics | Jackets | Terms | Training | Software | Products | Contact us |
|
JMK-1-H Jacket Maker
Corbin Manufacturing & Supply, Inc.
|


|
|
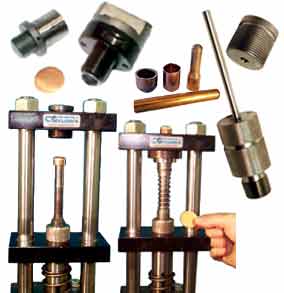
Corbin JMK-1-H Bullet Jacket Making Kit
The Corbin JMK-1-H Jacket Making Kit, for use with the Corbin CSP-2, CHP-1, or CSP-2H presses, makes precision bullet jackets in any caliber, some of which can then be redrawn to other calibers and trimmed to length by adding a JRD-2-H commercial grade jacket draw die and an adjustable trim die (ET-2-H) for each smaller caliber desired. The die set typically uses 1-inch wide by .030-thick copper strip, deep drawing grade with finished edges, but can use standard widths of 1.25 or 1.5 inches, in thicknesses of .030 to .125 inches. Corbin furnishes 1 x .030 copper in 5-lb bundles or 50-pound copper coils, and other sizes in 50-lb or 100-lb coil.

|
|
|
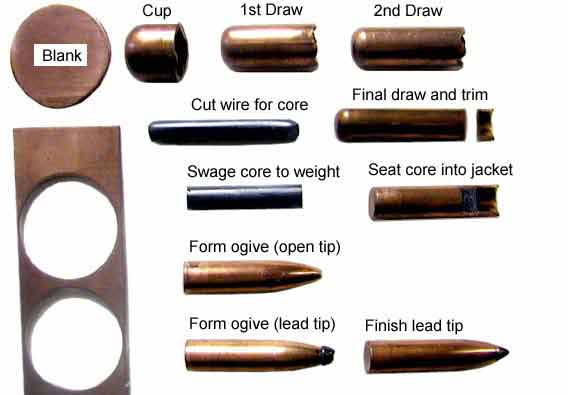
The JMK-1-H and the JMK-2-H both make a disk of a specific diameter as the first stage in producing a bullet jacket. The width of the strip and the thickness both multiply to determine the volume of material available for the jacket. The specific caliber and length and wall thickness of jacket for which the set is designed is the "main" jacket produced by the set. Any jacket that contains the same or less material can, in theory, be made from the same disk. Any jacket that uses more material cannot be made from the same diameter and thickness of disk, provided the correct size of cupping and drawing dies are used. Jackets which are shorter or smaller in diameter than the main jacket can be made by drawing down the main jacket in additional draw stages (which will usually also require a trim die to prevent the jacket from being drawn too long to fit on the punches). The wall thickness of the redrawn jacket is usually the same as the original or main jacket, but in some cases the thicker base material can be pulled up into the walls, or the clearance between punch and die can be made to "squeeze" the jacket into a thinner wall. These factors are dependant on several parameters including the amount of force required and strength of the material, requiring engineering work to determine what is specifically possible for any given set. But in general, you can maintain the same wall thickness in most successive draws, and usually can reduce the wall thickness as well. The jacket that you specify should be the largest and thickest wall, with the greatest length, of any of the other jackets you might also plan to make. If you order a kit for a smaller, shorter, or thinner wall jacket first, you may need a completely different set using a wider or thicker strip in order to make the jacket having more material volume in it. But if you order the largest jacket first, then you are assured that there is enough material in the strip to make smaller jackets with less volume. The width of strip is fixed by the disk cutting die, which can only cut the diameter for which it is designed. The cupping die can only work with this particular diameter of disk. But, the thickness of the strip can be varied without changing the disk cutting die. Then only the punch needs to be changed in the next step, cupping, in order to allow for the proper clearance between the die and punch with a different strip thickness. (If thinner strip is used, the punch must be larger, or else the cup will fold and buckle instead of drawing smoothly). Because of this, it is not always necessary to use the same thickness of strip for jackets that might not require as much material. For instance, most pistol and medium calibers of rifle bullets are drawn from .030 thick x 1.0 inch wide strip, which make pistol calibers from .45 ACP down to .30 Mauser. To make a 224 jacket, a strip of 5/8 width x .030 thickness might be used more efficiently. Most calibers within these ranges can be made without excess scrap material. To make light to medium wall thickness .458, .375, .338 and similar jackets, a 1.25-inch wide by .050 thick strip is used. This can also be drawn down to .308, .284, .277 and similar medium to small calibers, but the amount of material in the larger jackets results in excessive amounts of trim. To reduce the scrap amount, a .030-thick 1.25-inch wide strip might be substituted, along with appropriate changes in the punch diameters of the various cup and draw dies, and the additional small caliber draw dies and trim dies. With the JMK-2-H auto-feed jacket drawing set, the copper strip is uncoiled from a spool automatically, lubricated and fed into the combined disk cutting and cupping die without manual intervention. However, this action depends on the strip being flexible enough to feed and uncoil smoothly. Strip width has no significant effect, but thickness is critical. The .030 and even .050 thick strip will uncoil and feed, but the 1.40-wide, .093-inch thick strip used to make .50 BMG, long and heavy .408 and similar high velocity, thick wall, long jackets, will not. It must be fed manually. The JMK-2-H could be used, but it would require feeding straight lengths of the heavy copper stock manually into the machine. The JMK-1-H is designed for manual feeding, so it makes good sense to purchase it for use with materials thicker than 0.050 inches. A situation where you would probably want to buy a complete second jacket making kit would be (a) making both .50 BMG and light weight .308 or smaller jackets, or (b) making a series of pistol jackets from .45 to .30, and also making heavy wall .375 and .338 rifle jackets. The reason is that the difference in volume of material in these two groups of jacket sizes is so great that the scrap value from using even the same strip width, even in a .030-thick material, would soon cost as much as having a more efficient 2nd jacket making kit for a more narrow, thinner strip. It is best if the diemakers know, in advance, the entire range of calibers and lengths of jackets you wish to make, even if you don't want to make them all immediately. That way, the most efficient and cost-effective package can be designed so it will handle the entire range of calibers, even if this might be having two separate jacket making kits. With a manual press, it is important to design the number of stages so that none of them exceed the ability of an operator to apply reasonable force. In some cases, additional draw stages might be needed compared to what could be used in a power (hydraulic) press. The amount of reduction or wall thickness change accomplished in a single draw will directly affect the amount of effort or force required. At some point, the resistance is so great that the material strength is exceeded, and the jacket breaks through or tears apart. Draw steps must be kept well below this point. On the other hand, one does not wish to perform any more draws than are necessary for smooth operation with reasonable effort on a hand press. In summary, the tools needed to make a given range of jackets must be determined by careful design work in each situation. It is always best to discuss the jackets you wish to make now and possibly in the future, assign importance and sequence, expected volume range and determine how critical the various dimensions such as wall thickness and length will be to your bullet making. All of these factors help in designing a package that does what you need, without wasting either capital on duplication of future tooling, material from trying to use inappropriate sizes of strip in order to extend the use of a single jacket making kit, or labor from either trying to draw too much material in one step or in wasting time with unnecessary intermediate steps. All of these things can be worked out in advance with careful study and planning, which then results in a quote for equipment that does the best job for the least cost. | |
|
Corbin Manufacturing & Supply, Inc.
|
|
| Home Page | Price List | E-Mail Sales | Site Map | New Products | Auto Q&A | Terminology |
| Retirement | Specials | Real Estate | Software | How to swage | Classified Ads | Feedback |