| Home | Presses | Intro | Site Map | P.R. | Chemicals | Answers |

|
| Prices | Specials | How To | Bullets | B.Makers | Books | Classified | |
| Topics | Jackets | Terms | Training | Software | Products | Contact us |
| Home | Presses | Intro | Site Map | P.R. | Chemicals | Answers |
|
| Prices | Specials | How To | Bullets | B.Makers | Books | Classified | |
| Topics | Jackets | Terms | Training | Software | Products | Contact us |
|
|
 Core Swaging Core Swaging
 RBT Bases
Point Forming
Lead Tip Forming
RBT Bases
Point Forming
Lead Tip Forming
|
|
|
|
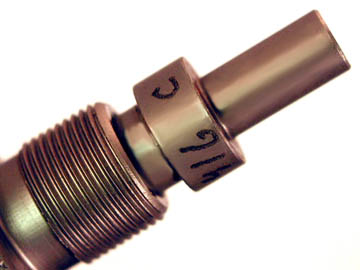
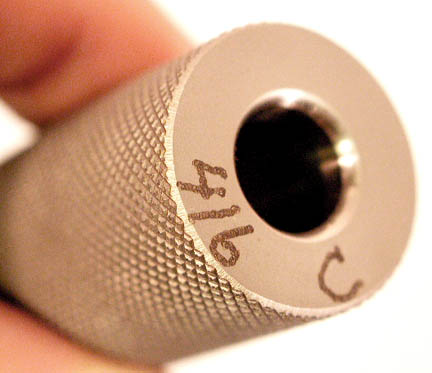
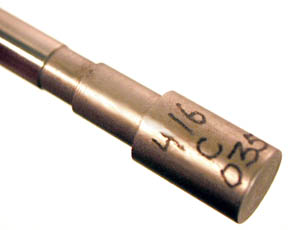
Punch and Die Markings
|
|
The |
|
|
|
Operating Instructions: The fit of punches and the setup procedure is very important with the core seating operation. If you do not use a jacket, the external punch needs to be a close fit to the ID of the die itself, in order to hold the high pressure and prevent lead from leaking around the punch. If you use a jacket, the punch diameter depends on where the core will be when it has been seated, in relation to the jacket length.
As you can see, using the correct seating punch is extremely important. A bullet usually comes out wrinkled or "accordian" pleated in the shank if the punch is too tight, so that it digs into the jacket ID too much and tries to collapse the jacket. Whether the punch is too large or too small for a given jacket ID and length of core, the final bullet will probably be undersized and tapered, compared to a properly seated core in the same jacket. Often the point forming die is blamed for this problem, when really the PF die is fine, and it is just the lack of enough pressure on the core, during core seating. If the punch is too small, the core will extrude past it before pressure can build high enough to expand the jacket to proper diameter. The point form die will try to expand the base a little, but generally it cannot expand the rest of the shank, so you have both an undersized and a tapered bullet from a perfectly fine point form die. If the punch is too large, it will impact the jacket wall and dig into it, so that the pressure you apply is used to compress the jacket wall toward the base, rather than to pressurize the core and expand the jacket outward. This can result in an undersized bullet, and may in extreme cases give you a pleated or wrinkled jacket instead of a smoothly expanded one. Once you have determined the proper size of punch to use for a given jacket and core weight (which is relatively easy: just measure the jacket ID for the length (and weight) of core you want to use, at the point where the core will be compressed to final height in the jacket). The best way to get properly fitted punches is to send sample jackets and cores for us to seat. If you want several weights or several different jackets, make sure to send samples of each in sufficient quantity to let us do enough tests, at least a half dozen of each. We need the weight or the actual cores themselves, in order to determine at what point down the jacket length the punch must seal. If you are just starting, and don't know exactly what you want, we provide a punch that fits the majority of popular weights for the jacket you order. A given punch may fit a range of weights provided the jacket does not have much taper. Corbin jackets typically have a relatively parallel mouth section, which steps up to a thicker base section (in the VB series of Versatile Benchrest rifle jackets). Most Corbin handgun jackets do not have much taper, but get thicker right at the base. Copper tubing jackets typically have straight walls without taper. Changing weights may not require a change in punch diameters for core seating, in that case. After you have cut a quantity of cores to fit the jacket ID loosely, clean them well to remove any lubricant and drop them into the jackets. A loading block is handy for holding the jackets upright at this point. After the cores and jackets are loosely put together, you have the option of bonding the cores with Corbin Core Bond, or seating them now. Bonding is primarily useful for edible game and big game hunting bullets, not for target or most defensive bullets. Before seating the cores, touch your finger and thumb with a drop of Corbin Swage Lube, and pick up the first jacket. Give it a roll between your finger and thumb to spread a film of lube on it. With a film of lube on the jacket, put it into the core seat die. You may need to raise the ram slightly so the internal punch drops down (except in -R type dies). In the Hydro Press, use the "load position" so the ram comes up slightly after ejecting the last bullet, retracting the internal punch automatically. The jacket must push easily into the die by hand. If it does not, the jacket is too large for the caliber of die, and must be drawn down with a JRD-1 draw die. Corbin jackets are sized correctly to drop into the core seat die for their intended caliber. Wipe a small amount of lubricant on the external punch. The external or top punch (in Corbin presses) is held in a "floating punch holder" in the press head. A bushing secures it in place. The bushing should be hand tightened. (If it should try to work loose in long production runs, a neoprene o-ring of proper size can be put over the bushing to act as a lock washer...do not use tools to apply extreme force, or the floating action of the punch will be negated. Normally, the o-ring isn't required, but Corbin can provide them on special order.) Adjust the punch holder (or the die, in -R die sets) so that the punch does not contact the core with the ram all the way up. Make sure that the ram is, in fact, all the way up. In the Hydro Press, you can set up any convenient position to be the "top", just by setting the top position sensor to allow enough ram travel so you can load and unload components easily, without having to move the ram its full six-inch stroke every time. In the hand presses, you want to use the top of the stroke as a physical limit for consistent results. With the ram at the top position, lower the punch holder (or die, in reloading press sets) so that the external punch touches the core and you cannot move the punch holder any closer by hand. (Never use pliers or tools to turn the punch holder...hand pressure is required. If the punch holder won't turn by hand, and the punch isn't contacting anything to stop it, send the punch holder back for inspection and repair or replacement. It may have a damaged thread. Dropping the punch holder on a concrete floor will tend to bend a thread and make it hard to turn. Once you have set the punch holder (or -R die) so that you can't turn it further by hand, lower the ram slightly and give the punch holder another quarter turn toward the ram. Then carefully raise the ram all the way up again. Repeat this process until you find an increase in resistance. Lower the ram far enough to see if the jacket stays on the punch, or comes off in the die. If the jacket has expanded enough, it will grip the die walls and pull itself off the punch tip. If the jacket sticks on the punch, but can be removed by hand, it means you have not moved the punch quite far enough down to generate pressure on the core and expand the jacket. |
|
If the jacket sticks on the punch firmly, and cannot be removed by hand, one of two things is happening.
Usually, if you are using the correct jacket and punch provided for it, any problems with sticking will be a result of making far too light a core. If you've told Corbin that the bullet needs to be, say, 168 grains, but you decide to make a 140 grain bullet instead, then the core will be much shorter than the one used to test the die at the die-works. That means the punch provided will probably be too large to go so far down into the jacket, and it will plow into the jacket wall and probably stick. Sometimes, just holding the pressure a few seconds longer at the top of the stroke will let the jacket expand more and free it from the punch. Sometimes, if the fit is just on the edge of right, you can use two or three strokes, holding each one a few seconds, and the jacket will come off in the die as it should. The solution usually is to add a few more grains of lead, to move the punch further toward the jacket mouth and reduce the drag on the punch. In most cases, none of this happens, and the core simply expands the jacket so that the core and jacket stay in the die when you lower the ram, and are ejected near the bottom of the stroke. With -R dies, the ejection is by means of a mallet and a plunger in the top of the die. Eject jacket and examine it. Look at the diameter (use a micrometer) and see if it is about .0003 inches under final caliber for your point form die. For instance, if you have a .224 set, and the point form die makes a lead slug of about .2241 inch diameter, you would want the seated core and jacket to be around .2239 inch diameter. It could be anywhere from .2236 to .2239 without causing any accuracy problems, but if it is .2241 already, that is too big. Ease off on the seating pressure. If that doesn't help, send both the core seater and point former back to be properly matched, along with sample bullets and seated cores. Sometimes changing core or jacket material or brands can have affect the diameter in such a way that the seated core comes out too large for the point form die, yet the correct jacket or core material would come out just right. This is most noticable when you change from using a drawn commercial jacket of one brand, to a copper tubing jacket, or when you get jackets that are much softer or have a greatly different wall thickness from the ones used to build and test the dies. The solution can be as simple as diamond lapping the point form die slightly, or it may require changing one or both dies. They work together as a pair, so that one cannot simply take any core seat die and use it with any other point form die of the same caliber. It may work, but there is no way to know without testing them together. As always, the cure is simple, once the problem is identified. |
|
Core seating dies are specific to a caliber, and may be specific to jackets and core materials in some cases. They match a given point form die, so that while it may be possible to order a core seat die separately from a point former, it is usually best to send sample bullets or seated cores, or the die which is going to be used with the new one, for matching. The close tolerances Corbin holds makes it likely that an off the shelf replacement will work with a recently produced set, but slight differences in wear and possible adjustments for unusual jacket, core, weight, or other situations might throw a monkey wrench into that assumption. If you are in a rush, odds are good a general replacement will work. But if you have time for shipping both ways, it is always a sure thing that the results of actual testing will work when you get them, as well as with the dies and materials used at the die-works to build the die. Note that you can make a semi-wadcutter bullet with the core swage and core seat die only, even though the core seater is usually 0.0003 inches or so smaller than the bore of the point former. This much difference seldom matters in the SWC handgun bullet, since bore variations are often much greater than that. For instance, even though a SAAMI spec for a .357 or .38 pistol might be 0.3570, manufacturing tolerance and practice usually would dictate that a given pistol of that caliber would have a 0.3565 to even a 0.3578 groove diameter. Shooting a .3567 bullet instead of a .3570 bullet isn't a problem in that case. Only if you were shooting benchrest pistol, and knew for sure that your barrel had a consistent groove diameter of .3570 would it matter enough to get a custom built .3570 core seater for your Keith SWC bullet. |
|
There is a slight issue with diameters regarding the difference between a CS-1 core seater and a similar but larger diameter LSWC-1 lead SWC die. The punches look the same. They are not the same. A LSWC-1 die is built with the idea of making a finished bullet, so it is sized exactly at the finished bullet diameter. A CS-1 die is made with the idea of processing the seated core through another die, the PF-1 point former, so it makes the bullet just slightly smaller to go into the next die easily. A Keith nose punch or a BG internal punch that fits the LSWC die would be slightly too big for the same caliber of CS-1 core seater. It would either stick or damage the punch to shove it into the smaller die. A punch made for a CS-1 core seater die is going to be slightly too small for the same caliber of LSWC-1 die. It won't hurt the punch or the die to use this mismatched combo, but it will let lead spurt around the punch, or extrude a thin film of core material if you use normal pressure. You may be able to make it work with lighter pressure, or just put up with the fin of extruded lead and wipe it off by tumbling the bullets. But it is better to get the right diameter punches. This mismatch occurs when someone has purchased a LSWC-1 die with several extra punches to make different nose or base shapes, and later buys a 3-die set that includes the CS-1 core seater to make jacketed bullets in the same caliber. Using just the first two dies (CSW-1 and CS-1) lets you make a jacketed SWC bullet with the jacket up to but not beyond the shoulder. But you cannot use the same punch that fit your earlier LSWC-1 die, even if it appears to be the same. Again, the micrometer can keep you out of trouble, if you check diameters carefully before trying things that might not work. Or, you can simply read the markings on the punches and dies. LSWC-1 dies are marked with a "W" for "Wadcutter". They make more than just wadcutters. But that is a good enough code to indicate they are different from other kinds of dies. The punches which fit them also have a "W" on the punch head or shank. They carry a number indicating diameter (or caliber), and a code indicating the shape of the cavity, for nose punches. CS-1 dies are marked with a "C" for "Core seater". (Core swage dies use the "S" marking for "core Swage". You just have to know or look it up, as there isn't any more distinctive way to do it with one letter). All the punches that fit a core seater have the "C" code on them as well. They may be marked with caliber or diameter, depending on what they fit. Those which fit inside a jacket have the diameter at which they fit the jacket. Technically, they can be used for any caliber as long as the jacket ID matches that number, at the point where you want to seat the core. Therefore, they are not necessarily marked ".357" unless they make a full diameter SWC bullet. Those which are marked with the caliber and nose shape are the ones which might be confused with LSWC punches...except for the "C" marking. If you pay some attention to the markings, or the diameters, of your punches before using them in a certain die, you should have no problem with using incorrect combinations of dies and punches. |
| Home Page | Price List | E-Mail Sales | Site Map | New Products | Q&A | Terminology |
| Retirement | Specials | Real Estate | Software | How to swage | CSW Die | PF Die |

