| Home | Presses | Intro | Site Map | P.R. | Chemicals | Answers |

|
| Prices | Specials | How To | Bullets | B.Makers | Books | Classified | |
| Topics | Jackets | Terms | Training | Software | Products | Contact us |
| Home | Presses | Intro | Site Map | P.R. | Chemicals | Answers |
|
| Prices | Specials | How To | Bullets | B.Makers | Books | Classified | |
| Topics | Jackets | Terms | Training | Software | Products | Contact us |
|
|
 Core Swaging Core Swaging
 Core Seating
Point Forming
RBT Bases
Core Seating
Point Forming
RBT Bases
|
 The Lead Tip Forming die (LT-1) is similar in appearance to the core seating die (CS-1) except for these two features:
Lead tip bullets can be made first by shaping the ogive in the point forming die, with a surplus of lead core compared to the jacket length. The extra lead will be extruded out the nose of the bullet, and upon ejection will be somewhat crushed or made into a blob of lead at the tip. The sharper the ogive curve, the more distortion takes place on the extruded lead. With blunt ogives, the lead tip may be satisfactory just as it comes out of the point form die. The jacket must not be closed down so small in diameter, at the tip, that its walls leave little or no space for the "stem" of lead to connect the tip with the main core. Pushing the bullet too far into the point forming die can press the open jacket together too much, so that the lead tip is poorly attached to the core, and may fall off in handling. If not enough lead is extruded, the amount of lead projecting from the jacket may not be sufficient to fill out a good looking, complete lead tip shape. Some practice may be necessary to find the right amount of lead to extrude. 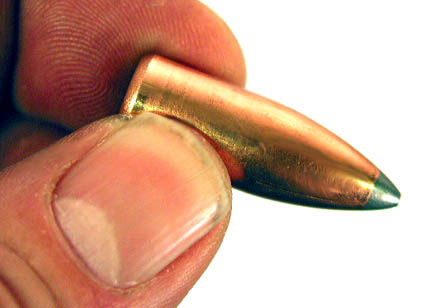 Although the ogive can only be changed with a point forming die, one lead tip die for a given caliber can be used with any number of shapes of internal punches. That is, you can get the die with a 6-S ogive shape, and add internal punches for a flat tip 6-S, a semi-spitzer 6-S, a sharp spitzer tip 6-S, as well as other curves such as 4-S, 1-E, and 3/4-E. The die acts as a precision guide. Pressure is very low in this operation. Too much force will merely extrude the jacket against the punch edge and create a ridge or ledge on the ogive. If this happens, back off the external punch so the bullet is not pushed quite so far into the die.
It has been suggested that a larger caliber LT die might be used for several smaller calibers of bullets, such as a .308 6-S die used with .284 and .270 caliber. While this is possible, the results are not as good as using the correct diameter of LT die, because the bullet is no longer being guided precisely on center into the punch. The alignment depends entirely upon the punch cavity and ogive of the bullet, which may be thrown off center slightly if the die is too large. Always use the correct caliber of die for the most accurate results. The base punch used with the LT die should match that used in the PF die. That is, if you made a rebated boattail .308 bullet in the point forming die, then the lead tip die should also use a RBT punch to push the bullet into the die. In most cases, the LT-1 die set comes with its own external punch, and this punch is identical to the one used in the PF-1 die. You can save money in some cases by selecting a flat base punch for the LT-1 die, and a RBT, cup base (CB), dish base (DB), hollow base (HB), or other shape for your point form die, then using the same punch in both dies when you make a given base shape. The difference is just the cost of one punch, however. |
|
Closing the Tip 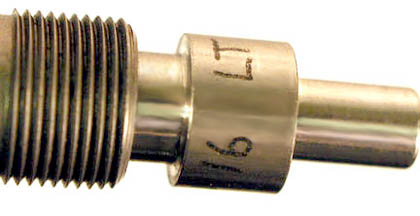 A LT-1 lead tip forming die can be used with a special "tip closer" internal punch to help nudge the open tip of a jacketed bullet more tightly closed, within broad limits. The amount of force that it takes to push the edge of the jacket more closely together has to be less than the amount of force that particular jacket (material, hardness, and thickness of wall) would require to become embossed with a shoulder or circular line from the edge of the LT punch.
The "tip closer" punch is a slightly more blunt LT-1 curve than that of the bullet. For example, if you make a 6-S ogive 224 bullet and then push gently on the open end using a 5.5-S or even a 5-S ogive punch, the edge of the jacket will contact the inside of the punch cavity first, rather than the entire ogive curve mating with the punch curve. All the force will be applied in attempting to create an ogive at the tip, which will push the tip closer together without the edge of the punch coming in contact with the rest of the bullet. The only drawback to this method is that your bullet will have a slightly different ogive on the tip section compared to the rest of the bullet. It may or may not even be noticable, and it has no technical disadvantage. It is a matter of appearance only, so if you don't mind the slight discontinuity of the ogive curve near the tip or if it doesn't seem obvious enough to draw attention, the B.C. of the bullet will be enhanced without any drawback. |
|
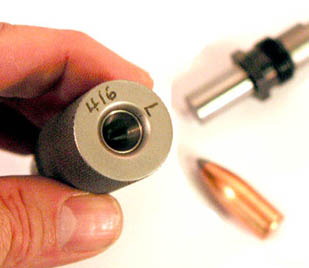
Punch and Die Markings The external punch is marked with "L" to indicate that it fits a lead tip forming die. The caliber of the die is also marked on the punch. The punch may be used with a PF-1 point form die, also, so it may be marked "P/L" indicating either point form or lead tip die use is suitable. |
|
The lead tip internal punch is marked "L". It will also be marked with the caliber and the ogive curve or other shape identifier. The tip closer punch will be marked with a "T" as well, and the actual ogive shape will be slightly shorter radius than that marked on the punch. The internal lead tip punch is what determines the shape of the lead tip. A LT die is universal for all shapes of a given caliber. It is important to know the difference between a die, and a punch! |
|
The
lead tip forming die has a "L" and the caliber marked on its mouth. The shape of the lead tip is not marked on the die, because this can easily be changed simply by choosing a different internal punch. The bullet must easily fit into the die by hand, in order to have sufficiently low ejection force to avoid marking the ogive with the punch edge.
|
| Home Page | Price List | E-Mail Sales | Site Map | New Products | Q&A | Terminology |
| Retirement | Specials | Real Estate | Software | How to swage | CSW Die | CS Die |
